

Mexican Pinwheels are a slightly spiced creamy chicken blend rolled up in easy to eat bite sized appetizer. Soft pillowy tortillas wrapped around colorful, amazing flavored filling are going to be a hit at your next gathering!
These are such a fun snack to serve! You can pair them with chips and some Mouthwatering Cowboy Caviar, Blender Salsa or Pico de Gallo. Make an impression the next time you bring a dish with these.
Mexican Tortilla Pinwheels
There is something about the color and easiness of pinwheels that make them so attractive. They are almost always the first to disappear at an event. The Mexican twist on the filling of these is different from what’s usually served. It will be such a nice surprise to bite into them. Pinwheels are so easy to eat, no mess. Everyone loves them.
The awesome thing about pinwheels is how easy they are to make. They do require refrigeration to help them set up and stick all together. They are so nice to make ahead of time and pop them in the fridge and then you can move on to other things. I love the smooth creaminess of these easy and super tasty little snacks.
Pinwheel Ingredients
Simple ingredients that are easy to find or have on hand.
- Cream Cheese: Make sure it’s softened
- Sour Cream: Full fat or low fat, both work great
- Rotel Tomatoes: This is tomatoes with green chilies, make sure to drain them
- Green Bell Pepper: Create texture and flavor
- Chicken: Cooked and shredded
- Mexican Cheese: This is a great blend of cheese that work well.
- Taco Seasoning: The best is this homemade seasoning.
- Green Onion: Chop these pretty finely
- Cilantro: Brightens the flavor and makes it taste so fresh
- Tortillas: Flour tortillas will roll the easiest.
How to Make Mexican Pinwheel Snack
Super easy to assemble and quick, just need a little time in the fridge.
- Mix: In a large bowl or stand mixer place all the ingredients except the tortillas. With the mixer or using a hand mixer beat together all the ingredients till smooth and creamy and mixed well.
- Roll: Spread about 1/4-½ cup of mixture on a tortilla leaving about an inch around the edges. Roll up tightly and cover really well with plastic wrap and refrigerate for at least 2 hours.
- Slice: When ready to serve slice into at least 1 inch pinwheels.
Tips and Variations for Easy Mexican Pinwheels
Whether it’s a special occasion or just because, these Mexican Pinwheels are going to be a crowd pleaser!
- Tortillas: You can use a wide variety of tortillas for these. Try flavored wraps or flatouts. I’d stick to flour based however, corn tortillas are not as soft and tend to fall apart.
- Filling: You can add black beans, corn, and for extra spice try dicing a jalapeño or diced chilies in the filling
- Cheese: The recipe calls for Mexican cheese which is usually a blend of 3 cheeses. This adds the best flavor combo and it’s usually finely grated which rolls up the best in the tortillas. You can easily sub out any other type of cheese you’d like. Cheddar, pepper jack, monterey jack, or even cotija will all work. I suggest finely grating what ever you use.
- Refrigerate: Don’t skip this step. This makes sure the filling and tortillas meld together so they don’t come undone when you cut them.
- Slicing: Use a serrated knife and make sure you don’t slice them too thin. They’ll come undone.
- Covering: When you put them in the fridge, make sure you cover them well so the ends especially don’t dry out. That’d be bad.
How to Use Mexican Taco Pinwheels
- Lunch: These aren’t just for appetizers, they make great lunches. Easy to eat, little mess and kids love them. (Adults too)
- Snacks: Better for you then crackers or junk food, these are perfect when you need a little snack
- Potluck: Perfect for a gathering, for easier transportation don’t cut them until you arrive at your destination. Make sure you cover them tightly so they don’t dry out.
- Serve: Serve with salsa or guacamole, or all by themselves. They are that good.
- Dinner: You can even use these for a light dinner served with rice, fruit and veggies.
More Pinwheels to Try
Because pinwheels are not just fun to make, their fun to eat!
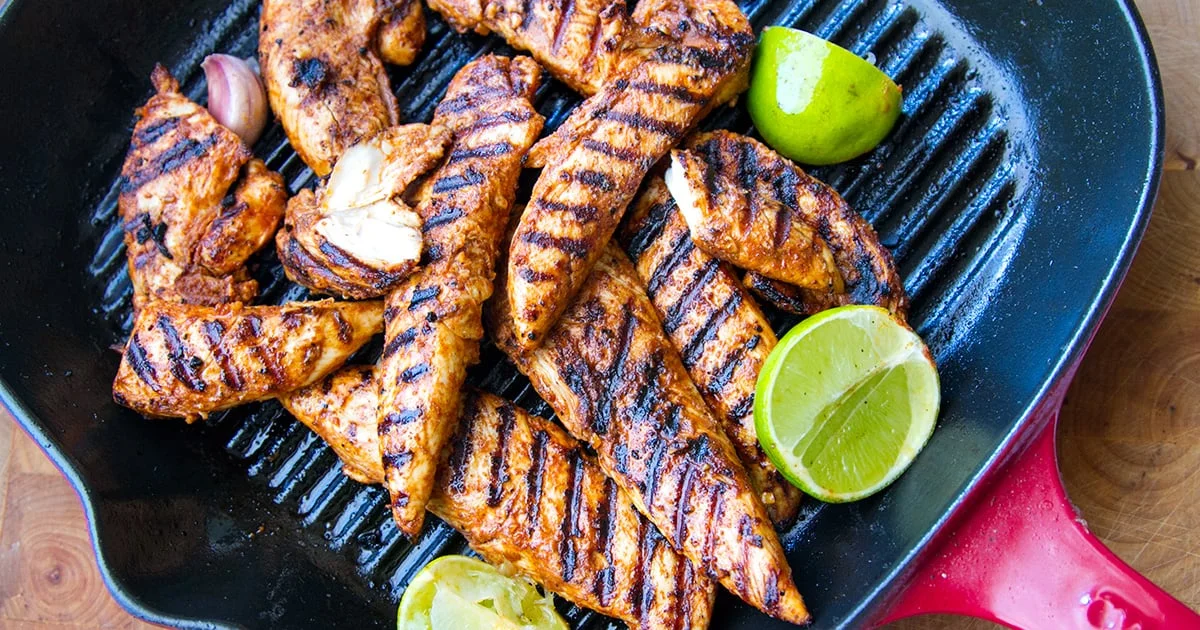
Spicy Paprika & Lime Chicken Tenderloins
These Spicy Paprika and Lime Grilled Chicken Tenderloins are a great addition to your BBQ repertoire. Take your taste buds to the Caribbean, Mexico or Spain on a little holiday! Can be cooked outdoors or on a stove. Paleo, Whole30, Keto, gluten-free.
Paprika & Lime Grilled Chicken Tenderloins
Whether you’re heating up the BBQ on a warm summer’s day or you need to give your skillet a bit of a workout, this is a fabulous chicken recipe that I know you will love.
My paprika lime chicken tenderloins are tender and juicy. The spices and citrus used in the marinade will take your taste buds on a little holiday to the Caribbean, Mexico or Spain – your pick!
I used chicken tenderloins because I find the meat more tender than the rest of the chicken breast and it’s easier to work with than the chicken thighs. You can use any chicken meat you like, just adjust the cooking time depending on the size of the pieces. This marinade will also work well with turkey, pork, quail, prawns and even beef.
What Are Chicken Tenderloins?
Still confused about what chicken tenderloins are? They are short, thin cuts taken from beneath the breast of the bird. You might find that some grocers will sell thinner slices of breast meat and call it chicken tenderloins or tender. They tend to be softer than chicken breast when cooked BUT should not be overcooked, they don’t need as long as the chicken breast.
Nutritionally speaking, they are the same as chicken breast meat – high in protein, minerals, low in calories and fat.
Make-Ahead Tip For Paprika Lime Chicken
The chicken tenderloins can be marinated ahead of time for an even more robust flavour; keep uncooked in the fridge for maximum of 3 days and freeze for up to 2 months and simply defrost overnight in the fridge before you want to use it.
More Delicious Chicken Recipes:
Description
Grilled paprika and lime grilled chicken tenderloins are great with any side dish and can be used in salads, tacos, and wraps. Can be cooked outdoors or on a stove.
- Mix the marinade ingredients in a large bowl. Rinse the chicken and cut larger pieces in half.
- Using your hands, rub the chicken with the marinade. Leave in the bowl, wrap with cling wrap and set aside in the fridge for at least one hour before grilling.
- If using a grill plate or a skillet on your stove, heat one teaspoon of coconut oil until sizzling hot. Fry the chicken pieces for 4 minutes on each side and then remove to a plate to rest. Make sure not to overcrowd the frying pan or you will end up with too much meat juice and stewed rather than grilled chicken.
- If using a BBQ, heat the plate to sizzling hot and either spray with olive oil or brush with coconut oil. Place chicken pieces on the plate with a little space in between and cook for 4 minutes on each side on medium/high heat with the lid on.
- Remove cooked chicken to a serving plate and drizzle with lime juice before serving.
Nutrition
- Serving Size: 2-3 tenderloins
- Calories: 331
- Sugar: 1 g
- Sodium: 783.6 mg
- Fat: 16.4 g
- Carbohydrates: 4.4 g
- Fiber: 1.3 g
- Protein: 41.3 g
- Cholesterol: 131.4 mg
Keywords: Tenderloins, Chicken, Paprika, Lime, BBQ, Grilling, Low-Carb, Paleo, Whole30
Join the Conversation (0)
Nutrition Facts
Amount per serving
- Calories N/A
- Total Fat N/A
- Saturated Fat N/A
- Cholesterol N/A
- Sodium N/A
- Total Carbohydrates N/A
- Protein N/A
Hi, I'm Alex!
I love sharing easy, healthy, and family-friendly recipes that anyone can make at home.

Be the first to comment on this recipe!